Advertisement

Friday, February 28, 2014

Free Space Planning Massing from Excel Add-in for Revit


From the LMNts website...

In continuation of the progress we’ve made in space planning with Grasshopper, we’ve seen a need for something similar for Revit.  When we first adopted Revit as our production platform we tried to solve this with a simple mass family that had parameters tied to a schedule, but it still required a lot of manual input in order to get the information into Revit.  Part of this data input could be mitigated with third party plugins, but there was still some functionality that we found lacking.  Regardless of the somewhat clunky workflow, the results could be quite good.


Our next push for programming in Revit consisted of developing a plugin in-house that we could mold to our needs and workflows.  What we’ve ended up with is a plugin that consists of four commands.  Two work together to import and modify mass elements based on an Excel file, while the other two are independent mass related commands.


Whenever you’re bringing data from one platform to another, formatting of that data is always going to be important.  For this tool the most important rule for formatting is that the first six columns are always the same.  There’s an Export function in the command to create an empty file with just the headers to aid in this, though if any thing is off, be it column order, capitalization, or spelling, the command will be unable to process the information.


Beyond that, the formatting is fairly flexible.  To create a mass, it just needs a ROOM NAME and ROOM NUMBER.  If any of the other pieces of information are missing it will still generate something.  For DEPARTMENT and ROOM TYPE, the last specified value is remembered, so it doesn’t need to show up in every line.  If QUANTITY is missing, it assumes a single element, and if PROGRAM AREA is missing it sets it to zero and makes the resulting box a 10′ x 10′ cube.  You are also free to add additional information in subsequent columns that can be mapped to other parameters or ignored.

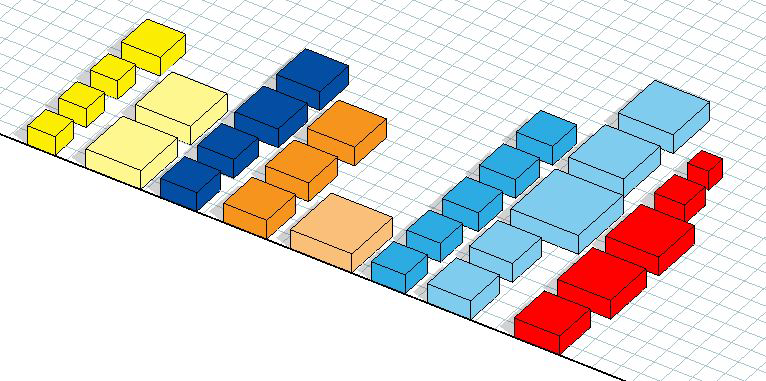
When the command runs, it will layout the resulting families by each DEPARTMENT/ROOM TYPE with a 10′ spacing between each component.


The last two commands will facilitate working with the masses after they’ve been brought in.  The Align Masses command will take a selected set of masses and array them in a line, horizontally or vertically with the ability to sort and control the spacing.


The Mass to Room command will map the information in the mass family to similar parameters in a room object, and place that room within the boundary of the mass’s footprint.

There's more information available on the LMNts website...

Thursday, February 27, 2014

Free Viewport Renumber Add-in for Revit


http://lmnts.lmnarchitects.com/
From the LMNts website...

I review many of the Revit models for the different projects in the office and one common thing I see is that views are not numbered in any logical order on a sheet.  It’s likely that the team just threw a bunch of views onto a sheet just to have the content there and intended to get back to it in order to clean up the organization and numbering in addition to any annotative tasks.   The problem is the renumbering is such a low priority it’s often left to the very end of a project when the team is already under heavy load just to get the project delivered on time.

It was one such project that I was reviewing just as they were nearing finishing construction documents and had a list of additional tasks for the team that was already quite busy.  In an attempt to make this one task at least a little easier I spent a little time writing a plugin that I could hand off to the team to renumber views more quickly.

There’s not much of an interface for this one, you simply go to a sheet and run the command.  It will then go into a selection mode asking you to “Pick viewports in the desired order.”


Then you go through and pick the viewports in the order you want them renumbered.  The selection occurs in a loop because the group selection options via the Revit API tend to order the selection by ElementID and not picked order.  Because of this you need to hit the Esc key once to move from selection mode to the next stage where you set the starting number and increment (step size).


This is the only UI to the command and it lets you specify the starting number and the step size.  It can increment the number forwards or backwards, but currently only works with numbers, no alpha or special characters yet.  Once you’re happy with that click OK to renumber the views.  You will get an error if you try to number a view to an existing number that’s not part of the selection set.  So if you have 10 views, but are only renumber 5 of them, you can’t use any of the numbers used by the other half.

There's more information on the LMNts website.

Wednesday, February 26, 2014

Free No Plot Add-in for Revit


http://lmnts.lmnarchitects.com/
From LMNts comes the free No Plot add-in...
 
Almost a year ago Harry Mattison from over at Boost Your BIM had a couple of posts that he used as an introduction to Events in the Revit API, particularly printing events, and in doing so showed a couple of ways (here and here) to implement a no plot type functionality in Revit. We took that kernel of an idea and decided to build our own, and ended up with a command that can can be used to turn almost anything into a non plotting object.

It works by looking for the string “NPLT” in type names, line style names, and subcategory names.  It will evaluate each view/sheet that you’re printing and hide everything that has NPLT in the name and also turn off the visibility of all subcategories with NPLT in the name.  After the printing is done it will undo all of the changes that it made.  It even works if you have view templates applied to your views.   Because it can be making a large number of changes to many views, it does have the potential to add significantly to print times with large projects.  So far I know of only one project we’ve tried it on that it affected noticeably, but your mileage may vary.

No Plot On and No Plot Off

 The No Plot Watcher panel that it creates has two buttons, one to indicate if it’s running or not, and another to change the settings.  You can click on the No Plot On/Off button to toggle it’s active state and you can change the default setting through the Settings button.  From there you can specify whether the watcher is on by default when you open Revit and you can have it prompt you when you print to see if you really want to use it.  That way you can leave it on even with big, complex projects and still have the ability to turn it off before you try to do a large printing run.

No Plot Settings

 Right now it is limited to looking for the NPLT character string in element/subcategory names, but I’m thinking I’ll add another setting that lets you specify one or more strings that can trigger the command so it can be customized a little more.  I’ve added 2013 and 2014 version in the download links below, so try it out and if you have any comments let us know.

There's more information available on the LMNts website.

Tuesday, February 25, 2014

Lyrebird: A Free, Open Source Grasshopper to Revit Add-in

LMN, an architecture firm that I proudly called my home away from home for the 4 years between 2007 and 2011, has an integrated design technology studio named LMN Tech Studio, or LMNts for short. Tim Logan and others in LMNts have been developing free Revit add-ins and I'll be posting about them here over the coming days. 

First up is Lyrebird, a Grasshopper to Revit interoperability tool. 

Excerpted from the LMNts website...

Lyrebird...create[s] intelligent objects (families) in Revit so that when we use Grasshopper as a computational design tool, we structure the data in Grasshopper to make it easier to instantiate those Revit objects.  This isn’t so much about translating geometry between programs but instead translating data between them.  With Lyrebird we have attempted to think through all of the possible ways we may want to translate between Grasshopper and Revit, and work within the constraints of both of their API’s to make sure the resulting elements are still user friendly and can be easily manipulated either in Revit or through Grasshopper.

The interface we’ve created is still pretty simple; there’s only one Grasshopper component that we hope has enough inputs and options to handle everything without being overwhelming.  On the Revit side, there are four commands added to manage Lyrebird and the elements that it creates.

Lyrebird plugin commands

We’ve tried to simplify the interaction between the programs, especially when it comes to mapping the Revit object to Grasshopper.  With our previous plugin that data was structured into a simple data tree, and then sent as a 2D array over to Revit where the data was mapped to a Revit family type, and then each list item was matched to a particular construction parameter (location point or rotation angle) or Revit parameter.  With Lyrebird this all takes place back in the Grasshopper interface so you’re seeing why the data is organized in a certain way immediately.  The process of sending information is also more intuitive, rather than clicking a button in Grasshopper, switching to Revit and activating another command, and then mapping all of the information, now you just click the button to send in Grasshopper and Revit automatically reads the incoming information and asks you if you want to create or modify the elements.

A word of warning though, Lyrebird’s Revit plugin is by default in the Off position (there’s a toggle) and you may want to leave it that way when it’s not going to be used.  It’s using the idling events in Revit to automatically trigger when data gets sent, but the idling event can be a resource hog and will cause Revit to use 100% of one of your cores at all times.

We’re also excited to say this is our first project of this nature that we’re making open source.  It’s not something we were actively promoting during development, but we do have the project up on GitHub if you’re curious about how we went about creating the different parts of the plugins or if you want to contribute so that we can make it better.

There's more information available on the LMNts website.

Further reading: Grasshopper-related add-ins

Sunday, February 9, 2014

Free Source Code to Remove "Duplicate Type Mark" Warnings in Revit

Our friend Harry Mattison offers several time saving and productivity enhancing add-ins for Revit on his Boost our BIM blog. For coding-minded individuals, there are additional add-ins in the form of source code in some of his posts. In fact, one of his earliest threads is just such an example...

"A friend asked how we could use the API to resolve the 'Duplicate Type Mark' warnings. This situation occurs when multiple users are adding elements (such as doors) and Revit is automatically numbering the instance parameter “Mark” for each instance. Each independent session of Revit does not know what mark values are being applied in the other sessions of Revit, so the elements in both local files get mark values 1, 2, 3," and 'Duplicate Type Mark warnings are raised every time the Revit project is opened.

In a series of four posts, Harry provides the add-in source code needed to clean up the file and remove these warnings.

Tuesday, February 4, 2014

Free BIM Consortium Add-in for Revit Includes 3 Tools

From Troy Gates' Revit Coaster blog...

BIM Consortium Revit Add-in First Release

I have been working with the Los Angeles Revit Users Group leadership group (known as the BIM Consortium) to start creating a set of Revit add-ins based on meeting discussions. I'm happy to announce the first release of the add-in.

This initial release comes with 3 tools...


3D Grid Generator

This tool is based on the 3D Grid family created by Jay Zallan. Jay demoed the family during a meeting that I happened to also be discussing macros. I challenged myself to take Jay's family and create a macro that would automatically place a 3D Grid family on every grid line in the model. After several iterations, I converted the macro to an add-in and here it is.

The tool is very simple. First load the 3D Grids family included with the add-in into your Revit model. Then start the tool and choose the levels that you would like to have 3D grids on. Then you can use Jay's original guide on how to use the 3D grids. Quick video demo can be found here.


** The first release does have a limitation that I am working on fixing and will release in a future update. It currently won't recognize that a 3D grid already exists when creating them. So if you run the tool twice on the same level you will end up with two families in the same place and Revit will let you know. If you want to place new copies if your grid changes, for now you will need to delete the existing 3D grids before you create new ones.

Create Dependent Views

This tool is very simple and came as a request. It will simply duplicate as dependent the active view 5 times. Saves you 5 right-clicks.

** I have already received a request to add a dialog that allows you to pick your own number. It will be in a future update.

Monday, February 3, 2014

RDBK_ReLoad Add-in for Revit

From RedBike Systems comes the RDBK_ReLoad add-in...

Selectively reload Autodesk® Revit® families into Autodesk Revit project.
ReLoad displays a categorized list of all Autodesk® Revit® families in the project and all are checked for reload by default.

Alternatively, you can choose one or more families from the list
 + check a category to reload all families of that category
 + expand the category to select individual families.

ReLoad searches for selected families in the Options/File Locations/Places directory list. If a family is not found, you will be prompted to manually select its location.


The RDBK_ReLoad add-in may be purchased on the Autodesk Exchange Apps website for USD 2.00.

Sunday, February 2, 2014

What's the Difference Between Revit Add-ins and Macros?

In covering application developer blogs such as Boost Your BIM, The Building Coder, and Punto Revit, there is sometimes a distinction made between macros and add-ins. So what's the difference? Harry Mattison provides the answer on his Boost Your BIM blog. Here's an excerpt...

"There are two different ways to work with the Revit API. In general, the code you write will be the same or almost the same in either case. Developing a macro is easier and simpler, but the trade-off is that you are limited in the development tools you use and how you share the macros with other people.  Developing Add-Ins involves more set-up and some technical mumbo-jumbo to register the add-ins with Revit. A main upside of Add-Ins is that you are better able to distribute them to other people."

There's more information in this excellent post on Harry's blog.

Add-ins, macros, plug-ins -- we cover 'em all on the Revit Add-ons blog.

Saturday, February 1, 2014

RDBK_Imported Line Pattern Remover Add-in for Revit

From Redbike Systems comes the RDBK_Imported Line Pattern Remover add-in...

For those who make use of linked or imported CAD drawings, this app is a great time-saver in managing those pesky line patterns that remain in the project and family files after the CAD drawings have been removed. Additionally, the app provides a list of imported CAD drawings that you can also choose to be removed.

A typical CAD document linked or imported in Autodesk Revit project or family with corresponding IMPORT-xxx line patterns.

RDBK_Imported Line Pattern Remover dialog showing IMPORT-xxx line patterns and the CAD document selected and ready for removal.

Selective removal of line patterns and warning where a corresponding CAD documents is not removed.

All imported line patterns and CAD documents(s) removed from the project or family, or none found.

The RDBK_Imported Line Pattern Remover add-in may be purchase for USD 2.00 from the Autodesk Exchange Apps website.