Advertisement

Showing posts with label Product Review. Show all posts

Wednesday, November 27, 2019

Product Review: RevitWorks' DOOR FACTORY Premium

Concept

According to RevitWorks' product page, DOOR FACTORY is...

The quickest & easiest way to make doors and curtain panel doors in Revit 
  • Create standard or unique doors in minutes
  • Any user – novice or expert
  • Consistent functionality and scheduling

Setup

I received two emails from RevitWorks, one with a download link and one with my activation key.

Once downloaded, the installation was smooth, featuring a professional installation wizard.

The DOOR FACTORY installation wizard

Thursday, May 4, 2017

Product Review: FenestraPro Premium – Energy-Efficient and Visually Pleasing Façade Design

By guest author Carl Storms

FenestraPro Premium – Energy Analyses and Facade Design in One Powerful Revit Add-in


FenestraPro was born when co-founders David Palmer and Simon Whelan saw a need:

“It was through our own practice and research that we recognized the requirement for software or a tool that allowed Architects to design energy efficient building and façades to achieve the required performance without compromising the aesthetic of the façade”.

Simon Whelan, Co-Founder / COO

The real goal of FenestraPro is to allow the Architect to have control over the facade design from an early stage of design through to completion. This goal can be seen right on the FenestraPro landing page, with the mantra: “Improve Your Design, Reduce Time & Maintain Aesthetic Control,” along with the accompanying graphic:


Thursday, March 23, 2017

Product Review – AVAIL Content Management System (Version 3.1)

Concept

AVAIL is the content agnostic content management solution from ArchVision that features deep Revit integration.

Installation

I downloaded AVAIL from https://www.getavail.com/Download. The download began immediately with no need to register. The installer download was 52.9 MB in size.

After agreeing to the license terms and conditions, the installation began. Installation took about five minutes.

The AVAIL "Content Browser" that provides in-app support for Revit is a separate download of 5.6 MB. Installation took just a few minutes.

AVAIL installs as a desktop application, and has its own menu item on the Windows Start menu.


Thursday, August 25, 2016

Product Review – BIMsmith Forge, for Creating Revit Wall, Floor and Ceiling System Families

BIMsmith is the free online service from Anguleris for creating wall, floor and ceiling system family assemblies.

After seeing BIMsmith at RTC 2016 NA, I thought it was high time I signed up for the service, and started creating content with it. I'm pleased to write that the experience was painless and yielded better than expected results.

Here's the process I went through.

On the BIMsmith landing page, there was a convenient link to signing up for free.


Registering required a modest amount of information. I appreciated that a phone number and address weren't required.


After submitting my information, the system immediately sent me a confirmation email. I clicked on the included link to complete my registration, and was taken to the My BIMsmith section of the site, and an introductory video began playing.

It's from My BIMsmith that assemblies can be created, and it's here that I discovered BIMsmith's plans to soon add roof assemblies to the service!


Sunday, February 14, 2016

Product Review: The 3Dconnexion CadMouse

About a year and a half ago, I reviewed the 3Dconnexion SpaceMouse Pro. I loved the device, giving it an A+. My only nit to pick was that I was hoping to use it to replace my traditional mouse, which, while technically possible, would be impractical. Enter the 3Dconnexion CadMouse – which is being marketed as "the first mouse for CAD professionals". Because 3Dconnexion's other devices are intended as second-hand devices, it makes sense that they would release a mouse of their own design for use as a primary input device.

Software Design

To get started, I downloaded and installed the latest 3DxWare driver. I then plugged the device into a USB port and was off to the races.

Of course, the 3DxWare software allows you to configure your mouse exactly as you like. The software is easy and intuitive to use.

Software design grade: A+

Hardware Design

Like the SpaceMouse Pro, the industrial design of the CadMouse is impeccable. The quality is outstanding, from the build quality all the way down to the packaging.


The "feet" slide more smoothly than with a typical mouse, and the mouse features a stainless steel lower bezel that adds durability without adding undue weight.


Thursday, November 19, 2015

Product Review – Autodesk Model Checker and Model Checker Configurator for Revit

In January of this year, while I was employed by the Seattle District of the US Army Corps of Engineers (USACE), I was tasked with evaluating the Model Checker and Model Checker Configurator tools developed by CADD Microsystems for Autodesk. Specifically, I was tasked with evaluating the effectiveness of the USACE configuration delivered with the Model Checker product with regards to how the checks met the intent of the USACE contract language. I also evaluated the ease of creating new checks with the Model Checker Configurator.

At the time, the Model Checker Configurator had not been released to the public, and so the work was under NDA. Towards the end of my engagement with these tools in July, I became aware of the new BIM Interoperability Tools website through which the tools would be published – prior to this the Model Checker was available on the CADD Microsystems website under Industry Solutions » Government Solutions – but I was told that the tools weren't quite ready to go, and so I held off on writing about them.

Then, on November 5, CADD Microsystems employee Jason Kunkel posted about the tools and the new website on his RVIT blog. I was happy to see that the tools had undergone a round of revisions since I last looked at them, and even happier to learn that some of my suggestions had been incorporated into the product.

All this is to say that this post has been a long time coming, and I'm happy to finally be able to review the Model Checker and Model Checker Configurator for the Revit Add-ons audience.

Concept
Here we look at the need that the applications attempt to fill.

The Autodesk Model Checker for Revit is a free add-in that checks Revit models based on a configuration file – read: a set of BIM requirements – and generates a compliance report.

The Autodesk Model Checker Configurator for Revit is a free standalone desktop application that is used to create configuration files for the Model Checker.

I especially like that the configurator and the checker are separate applications. This provides a mechanism for controlling who can create or modify configuration files. In theory, this also means that the Checker can be streamlined and simplified, whilst complexity is surfaced in the Configurator. It's also nice that the Configurator, because it's a standalone desktop application, is not Revit version dependent.

Concept grade: A+

Installation
Here we look at installation and initial setup of the applications.

Download of the Model Checker was quick and a standard installation wizard installed the add-in correctly so that it was automatically loaded into the Add-ins tab on the Revit ribbon.


Tuesday, February 17, 2015

Product Review – ViewSync

I took ViewSync for a spin today, and really like it – I'm especially impressed by how fast the application is.

Concept

ViewSync synchronizes open views with the active view. Zoom to an area in the active view and other open views zoom to the same area automatically. When zooming in plan views, ViewSync not only works across other plan views, but also ceiling plans, 3D views, and elevations!

Concept grade:  A+

Setup

Setup was fairly painless; I registered for the ViewSync trial here. I received an email from the developer several minutes later after he had reviewed my request with a download link. After downloading the installer, installation was a one-click process.

When launching Revit for the first time after the installation, license terms were presented, followed by licensing options.

ViewSync is installed on the Add-Ins tab.


Setup grade:  B-
(Deduction for the trial system not being entirely automated.)

Discover-ability

After agreeing to the license agreement and choosing a license option, I was presented with the option to open the online Help documentation. This was a nice touch to help me get started.

Discover-ability grade:  A

Usability

I toggled on ViewSync and checked the options. The default settings were perfectly acceptable to me.


I then opened multiple views and started zooming around. ViewSync worked quickly and flawlessly.


I think there are some great potential uses for ViewSync. For coordination purposes, it's a no-brainer; for instance, zoom around in the Architectural plan view and have the other discipline plan views update automatically. It's also useful for locating the same areas in 3D views and elevation views as in plan, which can sometimes be tricky and time-consuming otherwise.

Usability grade:  A+

Final Grade


ViewSync is brought to you by Marsh API and is priced at USD 9.00.


There's more information available on the Autodesk Exchange Apps website.

Related: All product reviews

Sunday, September 28, 2014

Product Review: RevitWorks Door Factory 2015 PRO

I first posted about the RevitWorks Door Factory add-in back in 2011. A lot's changed since then, and I wanted to do a full-on review of the product, and here it is.

Concept

"Create almost any door you want in seconds, without going into the family editor."

I would just add one word to this statement: "Create almost any door you want in seconds, consistently, without going into the family editor." I don't think it can be understated how helpful it is to have consistent content in one's Revit projects.

Setup

My setup was a little different than most in that Alex of Revit Works issued me a promo copy, which I downloaded from DropBox. Usually, one would purchase the product from the website.

An interesting aside is that there isn't a trial version of Door Factory 2015, per se. Instead, a free LITE version has been released, which includes "the best single and double swing doors," with the newly dubbed paid "PRO" version featuring more door types, door actions and features. There's an excellent chart about the differences between the LITE and PRO versions towards the bottom of the product page.

Once downloaded, the installation was smooth, and featured a professional-looking wizard.

Once Revit was launched, a new tool was available in the ribbon on the Add-ins tab. While not strictly following the Revit interface standard, the icon is attractive and unobtrusive.

The Door Factory tool in the Revit ribbon

When I launched the add-in, I was prompted for an activation key. Once I entered it, the key authenticated over the Internet and I was off to the races.

Setup grade: A

Discoverability

Upon launching the application, one is presented with a Start screen.

The Door Factory Start screen

On first blush, the Start screen may seem a little overwhelming, but I equate this to how some use the starting view in Revit to present useful project information to team members. Here there are links for an overview video on the RevitWorks website, a "New Features in 2015" PDF, feedback, a product FAQ, online Help, and several "Technical Data Sheet" PDFs, including "Door Factory Family Specifications" and how to create custom panels, handles, trims and user components.

Sunday, September 7, 2014

Supersized Product Review: CGS Revit Tools 2015

Awhile back, I published a series of posts about the CGS Revit Tools. I was invited by the developer to review the tools and post my thoughts about them on Revit Add-ons, and I finally made time to do just that.

Concept

From the vendor's website: "CGS Revit Tools enhance functionality and improve usability of Autodesk Revit Architecture, Structure and MEP resulting in more efficient project design."

Setup

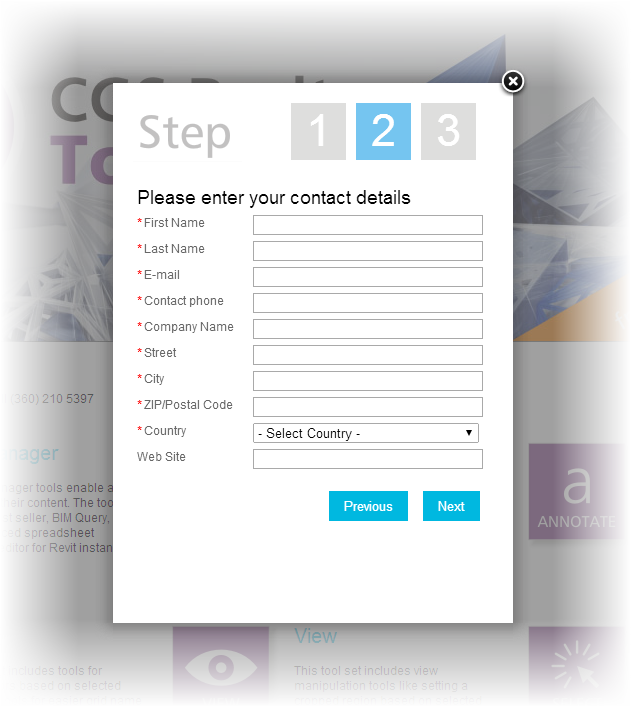
I downloaded the trial from the CGS website. After providing my contact information, the site emailed me a link for the download. After the download completed, I ran the .exe file. The program installed painlessly, and the tools were in the interface when I next launched Revit.

On the downside, the trial registration process felt a little too invasive to me. Requiring a phone number in this day and age might be a little over the top. I think name, email address, company, city, state/province and country should be enough information for acquiring a trial version of any software.

The registration screen

Setup grade: B

Discoverability

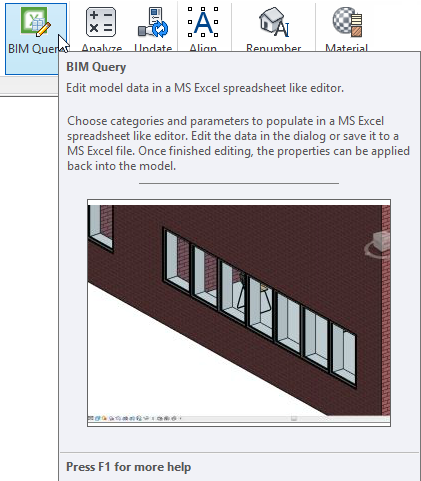
Each tool has Revit-style contextual help within the interface, some with videos.

Contextual help

Saturday, June 7, 2014

Product Review: The 3Dconnexion SpaceMouse Pro

Here on the Revit Add-ons blog, we tend to focus on software add-ins for Revit, but this doesn't mean that there aren't also some excellent hardware add-ons out there that can help to increase productivity.

Recently, 3Dconnexion graciously sent me one of their latest high-end 3D mice for review purposes, the SpaceMouse Pro. My overall conclusion? I would not want to work without it.

The SpaceMouse Pro

Design and Use

The first thing I noticed when unpacking the device was how heavy it is, weighing in at a dense 1.5 lbs (.68 kg). This is because one can use the central controller knob for functions by pulling up on it. When one's hand is positioned properly on the device, the weight of the SpaceMouse Pro helps to keep it in place. This is is a thoughtful design consideration that I very much appreciated.

The industrial design of the device is absolutely beautiful. It has a lot of eye appeal, and it is wonderfully ergonomic, as illustrated in the following image.


The ergonomic design of the SpaceMouse Pro

To get started, I downloaded and installed the latest driver. I then plugged the device into a USB port and was off to the races.

Upon first use, I was presented with a very professional interactive tutorial video that showed how to navigate a 3D model using the central controller. This was a perfect introduction: brief, to the point, and crystal clear.

Here's a video from the 3Dconnexion website showing how to use the central controller to navigate  3D models. Please note that this is not the video that is presented when first using the SpaceMouse Pro, as that one includes an interactive 3D model.


With a name like SpaceMouse Pro, I hoped that this device would do double duty by replacing my traditional mouse for use with all applications. This could be accomplished but would require some customization. It seems that, by design, the SpaceMouse pro is intended to be a "second hand" device. Once I reconciled myself with this, I was able to setup my workstation appropriately - and, for ergonomic reasons, I'm glad that I went this route (more on this later).

My input device setup, with the SpaceMouse Pro at left

In addition to the central controller, the SpaceMouse Pro has fifteen buttons.

The buttons on the SpaceMouse Pro

Starting with the button on the lower left and moving clockwise,  the first button is the MENU button. This button opens the 3Dconnexion Properties window, used to customize how the device responds to input (more on this later).

The MENU button